Sunday 30 December 2012

Wild Beastmaster

I'm such a dumbass.

You know when you think something sucks, and then later on realise that it's actually the greatest thing ever? Well yeah, this is one of those situations.

Just look at this card:

Completely OP

And then add this into my previous combo and you've got a definite win as soon as you attack. No one can handle multiple 11/11 or higher creatures hitting them all at once, especially when their creatures are all forced to block a 12/12 guy while the rest have free rein to cause whatever damage they can.

Plain OP.

Thoughts? Comments? Abuse for missing this earlier?

Monday 24 December 2012

MTG Golgari Win Condition

I've been playing around with my deck for a fair while now, and I think I've finally got my win condition down pat.

How do I win?

Well, first of all, I play this:
Double +1/+1 is sooooo good!

Then I play this:
It doesn't really matter who on.

Then it really depends on my opponents life. If they're still sitting at 20, then casting its Flashback on the same (or even a different creature) is a good idea, seeing as it'll bring that creature to over 20/20. If they're around 14-15 or lower, depending on the creature it was played on, then there's no need and we go straight to the next step!

Playing this:
"You can't catch me, fatty!"

Then we attack with everything and they die. Game over.

So let's check it out step-by-step quickly. We play the Corpsejack Menace, who doubles +1/+1 counters placed, then we play Increasing Savagery which normally would get me 5 +1/+1 counters, but because of the afforementioned doubling, we get +10/+10 on a creature (let's just say it's the Menace for now), so we've got a 14/14 sitting around. This is pretty pointless if they can block him though, isn't it? So we throw down a Golgari Decoy and attack with both. They're now forced to block the Decoy and your Menace goes straight in to do 14 damage.

By this point it's usually enough to finish them off, but if it's not then just spend another turn to Flashback the Increasing Savagery and make him 34/34 for some great overkill. Or just Scavenge a whole bunch of creatures if you use them (I'm fond of Slitherheads personally, and 3 of those would get you the 20/20 you need for absolutely no mana cost).

With my limited experience with the game, I'm pretty happy with this to be honest. Now I've just got to work out the rest of my deck...

Thoughts? Comments?

Saturday 22 December 2012

Skaven Weapon Teams Roles and Comparisons

All dem weapon teams... Which one do I choose? Should I mix it up? How many? Well, let's find out!


Warpfire Thrower
The most expensive team you can buy, and for good reason. At S5 it cuts through armour and wounds better than any of the other Weapon Teams, as well as causing D3 wounds per unsaved wound. This thing is a monster against the likes of Ogres and Monstrous Cavalry and it can be put to good use against Monster-riding Lords/Heroes if you must. Doing just that won me a game once, actually.

Unfortunately, however, the Warpfire Thrower is a move or fire weapon and its Misfire Chart is brutal. If you roll a misfire you only have a 1/6 chance of not losing your Weapon Team instantly.

Despite its downsides, the Warpfire Thrower is my favourite Weapon Team. It causes huge damage with a high strength and D3 wounds, and being a Template Weapon it hits huge amounts of models. It can also Stand and Shoot if anyone decides to charge it, which is nice. There's really no army the Warpfire Thrower isn't good against.

Preferably fire it into large clumps of expensive Infantry, but really it can be used in any situation you need it for.

Ratling Gun
The cheapest option, and on the surface it doesn't look too bad, but once you dig a little deeper I don't think it's as great as it first appears.

The first issue is that it is very random. You can either play it safe and only roll 2-3 time to see how many shots you get with a small risk of getting a misfire or you can roll 4+ times for maximum shots but put yourself in a very dangerous situation in terms of misfire chances. The first option, while safer, means fewer shots and less casualties, while the latter is a more high risk, high rewards kind of thing.

Random shots aside, you also have to roll To Hit and with the poor BS of the Weapon Teams only half the number of shots will even hit. Then with only a S of 4, it won't wound as much as the Warpfire Thrower team either.

With all that taken into account, the Ratling Gun really won't do a whole bunch of damage.

Either way though, I do think Ratling Guns have a place in an army. I'd consider taking 1-2 in a list as chaff-removal. Unlike the Warpfire Thrower there's no chance of the Ratling Gun over shooting and it has a lower chance of a misfire, so you'll almost definitely get some hits on the target and against a lot of chaff only 1-2 wounds are all that's needed. 6 is the most number of wounds I can think of for a small chaff unit, and that's our own Rat Darts. So while not extremely powerful, Ratling Guns do have a place!

Doom-flayer
On-par with the Ratling Gun in points, and a very, very interesting option as well. It's the toughest of the Weapon Teams with a 3+ armour save to the front and a 5+ to the side, it does D3 Impact Hits as well as an Artillery Dice worth of S4 auto-hits in combat and it has Armour Piercing.

I haven't used this Team, but I think it'd be good fun to use. Considering its superior armour save, I'd say throwing it into the side of a unit that some Slaves have held up would be a good use, otherwise I'd use it to take on Archers and chaff. It seems fairly flexible in its roles, being able to take on just about any lightly-armoured opponent, just avoid anything heavily armed and armoured and it should do alright.

I think I'd only use it in friendly games though. Save competitive games for the Warpfire Throwers and Ratling Guns.

Poisoned Wind Mortar
The most mobile of the standard Weapon Teams, but it's really my least favourite.

It may be able to move and fire, but it only fires a small blast, and with the way things scatter in Fantasy it's an extremely inaccurate weapon. It rarely hits anything, rarely wounds what it does hit and then explodes horribly.

It looks good on paper, but in my experience I don't think it's worth the points. If it was cheaper than I think it'd definitely be worth it, but as is you'd be far better off forking out the extra 5 points for a Warpfire Thrower.

Maybe you've had better luck with it than I, but it has been extremely lack-lustre for me.

If you do want to use it, however, I suggest targetting any large, heavily armoured units first. Things like Knights make good targets if you're feeling lucky and think you can get some hits, while hordes will almost definitely get you some hits but the innate armour-ignoring abilities of the weapon will be wasted and you'll have a hard time killing many. The Warpfire Thrower is better in just about all situations.

Warp-grinder
An interesting one. It can only be taken on Night Runners and Gutter Runners, and is only taken for its deployment capabilities.

So let's look at those capabilities, shall we? The unit goes into reserve and comes in on a 4+ from turn 2 onwards. They come in from a marker that's placed at the beginning of the game and scatter using a Scatter Die and an Artillery Die. So it's extremely random, and the enemy can avoid you or place a big, fat combat unit right on top of the marker. If you pop up and didn't scatter too much you'll be in combat with someone who will wreck you instantly.

Personally I'd never take a Warp-grinder with either Night or Gutter Runners. It's too random and you have a good chance of losing the entire unit with a misfire. In combat it only does D3 S4 hits too, so barely anything noticeable. Too random and far too dangerous for the Skaven player to be considered if you ask me.

Thoughts? Comments? Suggestions?

Daemon Prince: Why They're Not Broken

It is the belief of a very special few that the Daemon Prince's Daemon of X special rule is broken because it says "Daemons of X have...". I'm going to explain why it's not broken.

I guess this guy is a little broken, isn't he?

First of all, let's try to understand why some people think the rule is broken.

I'll use the Daemon of Nurgle special rule as an example. Because the Daemon of Nurgle special rule says that "Daemons of Nurgle have..." then some people take it to mean that any Daemon of Nurgle in the same army as a Daemon Prince with the Daemon of Nurgle rule instantly gain all bonuses that the Daemon Prince receives.

So what does this mean within our own Codex? Well, according to these people, if you give a unit a Mark of Nurgle, it then becomes "of Nurgle", and if it has the Daemon special rule it is therefore a "Daemon of Nurgle" and is as a result effected by the Daemon Prince's special rule. Warp Talons with Shrouded, anyone?

Because of a 15 point mandatory upgrade you now have one of the most broken armies in the game, right?

Wrong.

Why this is wrong is pretty simple really. The "Daemon" Universal Special Rule and the "Mark of Nurgle" are two completely seperate entities. It does not say anywhere, on any page ever that a model with a Mark of X and the Daemon special rule becomes a Daemon of X.

That's that.

But why does the entry say "Daemons of Nurgle have..."? Because Daemon Princes are not a one-per-army unit. You can have multiple Daemon Princes in your army, and thus all the Daemon Princes with the "Daemon of Nurgle" special rule are "Daemons of Nurgle".

What about Codex: Chaos Daemons though? To be completely honest with you, I have nothing on that one. It is indeed very possible to argue that all Nurgle Daemons from Codex: Chaos Daemons gain the rules for being a Daemon of Nurgle, and whether this was intended or not only time will be able to tell. Unless I missed something, of course.

Basically: Daemon of X does not do anything for any unit from C:CSM but it might be a little broken when combined with units from C:CD.

Thoughts? Comments? Proofs?

Tuesday 18 December 2012

Daemon Prince: Which God?

I kind of enjoyed writing about the Marks and Icons, so I thought I'd do a similar thing with the Daemon of X that is mandatory on your Daemon Prince.

Dem abs


I'm not going to bother mentioning the Hatred (Y) beyond now because it doesn't seem necessary. It's not what you should be focussing on when deciding which upgrade to take.

Daemon of Khorne
Furious Charge and that's it. Really? In all honesty I feel a bit more effort could have been put into this one, and as is it's pretty useless. S6 is the magic number. At S6 you wound T4 (the majority of opponents you face) on a 2+ and you can cause Instant Death on T3 (the second most common Toughness value - taking popularity of Marine armies into account) opponents.

But what do you gain from becoming S7 instead of 6? Very little, really. You can penetrate the armour of vehicles slightly easier, which is kinda pointless seeing as you can just use your Smash attacks anyway for S10 and rerolls for penetration, and you can wound T5 opponents on a 2+ for a single round of combat, but how common are they?

Not common enough to take this upgrade over any of the others, especially with it being the cost it is.

Daemon of Tzeentch
Combined with Power Armour and Wings this is a very nice option. Slap on a Burning Brand of Skalathrax and you never have to stop Flying either.

Definitely an awesome upgrade when you consider that most anti-air is AP4, so you've got an extremely small chance of actually taking a wound.

Nice if you want to just keep on Flying around with the Burning Brand, or even if you decide to beat face with the Black Mace.

Daemon of Nurgle
Considering that Wings are essentially a must-have on Daemon Princes (you do want to actually get close to the enemy, right?) the only real downside to this option is that you'd have to make use of terrain constantly to really benefit from it at all. If you can manage that, however, it is slightly better than the Mark of Tzeentch when outside of combat. When in combat though, the Mark of Tzeentch is better.

I'd be giving this Prince some Wings, Burning Brand and nothing else. You don't want to rely on your armour save because there's really no point if you can use the terrain and you don't want to be in combat either because you have absolutely no benefits there.

A decent upgrade, but considering its fairly restrictive nature in actually benefiting from it, I don't know if I'd bother over Daemon of Tzeentch.

Daemon of Slaanesh
Rending is absolutely useless because you benefit from it in neither combat against infantry or vehicles. An extra 3" on your run is pointless because you're always Flying. Pointless. Even the Daemon of Khorne upgrade is more useful.

Conclusion
The Daemon of Tzeentch is really the only one that's very good, while the Daemon of Nurgle upgrade is pretty good but not great. Daemon of Khorne is something I'd only take if I were running a fluff-based Khorne army, but even then I'd probably just take Kharn. The Daemon of Slaanesh upgrade shouldn't be touched by a 10" pole, unfortunately. Slaanesh is my favourite god too :sadface:

A brief summary of the order:
  1. Daemon of Tzeentch (OP)
  2. Daemon of Nurgle
  3. Daemon of Khorne
  4. Daemon of Slaanesh
And just as a last note, the Black Mace is OP on a Daemon Prince. My favourite kit is Daemon of Tzeentch, Wings, Power Armour, Black Mace, Burning Brand of Skalathrax (if you have points).

Thoughts? Comments?

Tuesday 11 December 2012

The Role of Each Mark of Chaos

Deciding which Mark to give to your units of Chaos Space Marines and other otherwise Undivided units can be one of the hardest decisions to make when writing a list for your Chaos Space Marines (unless you're going for a specific god), so to make that job a little easier, it's probably wise to have a good idea of the role of each Mark, and which units they work best on.

For simplicity, I put the Marks into three categories: Offensive, Defensive and Both.

Offensive Marks
 
Mark of Khorne

He's just so... Khorney!
This one is pretty obvious in its use: put it on a unit and they'll massacre in combat. This is the only offensive mark we have, i.e. the only mark that is designed purely to cause more casualties but will not prevent you from taking casualties in return.

The kinds of units you want this on are units that will be throwing their weight around in combat. The other important thing, however, is that you want to consider whether or not the unit is tough enough to actually punch enough things for them to do their job, or if they're cheap enough for you to not worry about their survivability anyway, as long as they do enough. 

Units like Chaos Space Marines and Cultists with close combat weapons, and maybe Raptors are perfect examples of cheap units that can go punch-for-punch with some more elite units given a Mark of Khorne, while Mutilators and Terminators are some of the more expensive but tougher units. I wouldn't take the Mark of Khorne on Warp Talons personally because it just seems like far too much overkill.


It should go without saying really, but anything that should be shooting is not worth giving a Mark of Khorne, this includes anything with Plasma Guns. If you give a Mark of Khorne to a unit of Chaos Space Marines, make sure they get Meltaguns/Flamers. Rapid Fire weapons are wasted points here.

Defensive Marks

Mark of Nurgle
Disgusting!
Another pretty obvious one (in fact, I think they all are really), and a very popular Mark as well. There's really nothing the Mark of Nurgle isn't good on.

I think the main thing really is: when do you take the Mark of Nurgle, and when Tzeentch?

Well, the Mark of Nurgle doesn't improve your save or give you a better chance at stopping your guy from dying after the wound has been caused, instead it simply reduces the number of wounds taken altogether.

In general, the Mark of Nurgle helps against anything that's S6 (S7 if on Bikers or Spawn) or worse by simply lowering the number of saves you have to take. This means that your models with a Mark of Nurgle will generally be very resilient when it comes to walking through a hail of Bolter fire or weathering an Explodes! result from a vehicle.

But what does it not provide defence against? Well, simply put, things like Plasma Guns, i.e. anything with a high enough strength to wound you on a 2+ anyway, which will often ignore your saves as well. In situations like this, the Mark of Nurgle becomes completely worthless.

Fortunately most guns are not Plasma Guns, but unfortunately Plasma Guns will be the bane of your existence.

The kinds of units that benefit the most from the Mark of Nurgle are Bikers and Spawn thanks to their already bloated toughness, which actually means that even Plasma Guns will only be wounding on 3's. Chaos Space Marines, Raptors or anything else without a pre-existing Invulnerable Save also benefit from the Mark of Nurgle far more than they do from the Mark of Tzeentch.

Mark of Tzeentch

Needs more change to be more competitive

The Mark of Tzeentch protects you against all the things Mark of Nurgle doesn't, but won't help you at all against the things that the Mark of Nurgle does, so this puts a player into quite the sticky situation... Who do I take which Mark on? When?

Well, first of all the Mark of Tzeentch really is pretty pants on a unit that doesn't already have an Invulnerable save, because a 6++ is just really not worth the points. So that leaves us with the likes of Terminators, Warp Talons, Obliterators, Mutilators and Possessed.

Whether you take Mark of Tzeentch on these units or not depends on a few things:
  • Do you want to avoid terrain so you can move faster/avoid Dangerous Terrain?
  • Is there little 4+ cover terrain pieces in the area you play?
  • Do you need a unit to escort a MoT Lord/Sorcerer?
  • Do people in your area spam Plasma/other AP2 weapons?
 If the answer is "yes" to any of the above, then the Mark of Tzeentch could be worth considering. If it's "yes" to 3-4 of them, then I'd definitely be taking it on some Terminators (if you run any Terminators).

So the Mark of Tzeentch is a bit more specialised and a far less safe option than a Mark of Nurgle, but it does have its perks in certain places and is definitely worth considering.

Both

Mark of Slaanesh

"Both" doesn't just apply to Mark uses here...

The Mark of Slaanesh is, in my opinion, the best Mark overall in the book. The Icon of Excess does play a role in this, but we'll get to Icons in just a moment.

With a +1 Initiative bonus, the Mark of Slaanesh applies only to combat, but is still something worth considering on certain shooty units as well for the Initiative alone.

To understand how +1 Initiative is a fairly potent offensive tool, we must first work out how it's good defensively.

In essence, the Mark of Slaanesh prevents you from taking casualties in the same way the Mark of Nurgle does: by reducing the number of saves you actually have to take. It does this by allowing you to strike before most opponents, which allows you to kill a couple of models in combat before those models even have a chance to strike which therefore means that there are less attacks coming back at you, less attacks hitting, less attacks wounding, less saves you have to take and ultimately less casualties caused to your unit.

But here's where it gets good...

Unlike the Mark of Nurgle which has absolutely no benefits in combat against something like a Dreadnought, the Mark of Slaanesh allows you to hit it with a whole bunch of Krak Grenades before it can hit you, which means that you can potentially knock off the last of its Hull Points before it turns your unit to mush with its S10 AP2 attacks.

So how does it work offensively?

Well, it's mostly in the way it allows you to play your models: more aggresively. Normally your standard CSM wouldn't be able to take on certain units in combat, but because of their improved Initiative they can plow right into the enemy because of the significantly reduced fear of taking too any casualties and losing combat. Furthermore, the unit can only really be defensive if they have some offensive hitting power, otehrwise everything just goes downhill.

But it's also a great offensive stat against the likes of Eldar and Dark Eldar who might otherwise use their Initiative in the same way you'd use yours: to cause casualties before the enemy can strike and thus take less in return. By having a Mark of Slaanesh you now have an offensive bonus against their Initiative 5 units in that you remove their defensive bonus from Initiative, ultimately leaving them with almost no defense and allowing you to strike with all of your force.

The only real downfall of the Mark of Slaanesh is that it only works in combat, but then again, combat is ultimately inevitable in some situations.

Units that work well with a Mark of Slaanesh are any combat-oriented unit, as well as any short-ranged shooting unit (Chaos Space Marines with Plasma Guns for example) because they're generally operating in a 12" distance from the enemy and will likely get charged.

The important thing to remember is that the more damage your unit can cause in close combat, the better it will be defensively as well. Maximise the damage you do, minimise the damage you take.

With that out of the way, it's time for...

...

*drumroll*

...

Icons

Icon of Wrath (Mark of Khorne)
Gives you Furious Charge and rerolls to your charge range. Absolutely fantastic in my opinion. It really just makes the unit better at its role, no more need be said.

Icon of Despair (Mark of Nurgle)
This is probably the worst Icon of the lot. It's cheap, sure, but with the amount of Fearless/ATSKNF/Leadership 10 around it'll hardly have much of an effect ever. However, when and if it does work, it will be brutal to the unit on the receiving end, so it's not too bad if you have a spare few points lying around.

Icon of Flame (Mark of Tzeentch)
A reasonable Icon for a shooty unit and I've seen some people take Mark of Tzeentch just for the Soul Blaze, but I don't think it's that great. It has a place on a unit of shooty Terminators or some Obliterators, but otherwise won't see much play because most of the units it'd be good on aren't that great with a Mark of Tzeentch in the first place.
Icon of Excess (Mark of Slaanesh)
Throw this on the unit and suddenly you've got one of the best defensive kits in our book, beaten out only by Plague Marines themselves. Suddenly your units can whether a storm from a distance and beat face in combat. The best Icon in the codex. 

Thoughts? Comments?

Monday 10 December 2012

Noise Marines vs Thousand Sons

Yet another topic that's debated (arguably less than previous topics, I will admit) is whether Noise Marines or Thousand Sons are superior as a purely shooty troops choice. So let's get into it!

Trigonometric!


Here are the unit builds:
10 Noise Marines - 8 Sonic Blasters, Blastmaster, Icon of Excess - 264pts.
10 Thousand Sons - 265pts.

With only a one point difference, you'd better hope that they're equally worth taking...

First of all, note that I will always assume the Noise Marines are 13"-24" away and that they haven't moved. The Thousand Sons are within 24". Blastmaster, Tzeentch's Firestorm and Doombolt will all be given 3 hits.

Furthermore, Cover is irrelevant against Noise Marines but will be taken into account against the Thousand Sons.

Let's see how they do against some:

MEq

Wounds caused by Psychic Powers
Tzeentch's Firestorm: 3 hits, S5 on average (benefit of the doubt), 2 wounds, 0.666... dead. If that model dies average 2 S3 AP- hits on the unit, 0.666... wounds, 0.222... dead for a total of 0.888... dead if the first hits caused a casualty.

Doombolt: 3 hits, 2.5 wounds, 2.5 dead if no cover, 1.666... if in 5+ cover and 1.25 dead if in 4+ cover.

Noise Marines
25 S4 shots, 16.666... hits, 8.333... wounds, 2.777... unsaved wounds. Blastmaster gets 3 hits, 2.5 wounds, 2.5 dead Marines for a total of 5.2777... dead.

Thousand Sons
Out of cover:
Outside of Rapid Fire range:  9 S4 shots, 6 hits, 3 wounds. 3.666... to 3.888... dead with Tzeentch's Firestorm, 5.5 with Doombolt.

Inside Rapid-fire range: 18 S4 shots, 12 hits, 6 wounds. 6.666... to 6.888... dead with Tzeentch's Firestorm, 8.5 with Doombolt.

In 5+ cover:
Outside of Rapid Fire range: 9 S4 shots, 6 hits, 3 wounds, 2 unsaved wounds. 2.666... to 2.888... dead with Tzeentch's Firestorm, 3.666... dead with Doombolt.

Inside Rapid Fire range: 18 S4 shots, 12 hits, 6 wounds, 4 unsaved wounds. 4.666... to 4.888... dead with Tzeentch's Firestorm, 5.666... dead with Doombolt.

In 4+ cover:
Outside of Rapid Fire range: 9 S4 shots, 6 hits, 3 wounds, 1.5 unsaved wounds. 2.1666... to 2.3888... dead with Tzeentch's Firestorm, 2.75 dead with Doombolt.

Inside Rapid Fire range: 18 S4 shots, 12 hits, 6 wounds, 3 unsaved wounds. 3.666... to 3.888... dead with Tzeentch's Firestorm, 4.25 dead with Doombolt.

So against MEq I've got to say that the Noise Marines are the better option because, let's face it, no opponent in their right mind is going to leave a squad out in the open for you unit of AP3 Bolter wielding dudes to shoot, so we can pretty much ignore that part of the math, and as soon as the enemy enters even the slightest bit of cover the Noise Marines instantly win out through raw fire power.

It looks like it's just downhill for the Thousand Sons from here, but let's just see how bad it gets...

TEq
Wounds caused by Psychic Powers
Tzeentch's Firestorm: 3 hits, S5 on average (benefit of the doubt), 2 wounds, 0.333... dead. If that model dies average 2 S3 AP- hits on the unit, 0.666... wounds, 0.111... dead for a total of 0.444... dead if the first hits caused a casualty.


Doombolt: 3 hits, 2.5 wounds, 1.666... dead with no cover or 5+ cover and 1.25 dead if in 4+ cover, 0.8333... dead if they have a Storm Shield.

Noise Marines
25 S4 shots, 16.666... hits, 8.333... wounds, 1.3888... unsaved wounds. Blastmaster gets 3 hits, 2.5 wounds, 0.41666... unsaved wounds for a total of 1.80555... dead.

Thousand Sons
Out of cover:

Outside of Rapid Fire range:  9 S4 shots, 6 hits, 3 wounds, 0.5 unsaved wounds. 0.8333... to 0.9444... dead with Tzeentch's Firestorm, 2.1666..., 1.75 or 1.333... dead with Doombolt.

Inside Rapid-fire range: 18 S4 shots, 12 hits, 6 wounds, 1 unsaved wound. 1.333... to 1.444... dead with Tzeentch's Firestorm, 2.666..., 2.25 or 1.8333... with Doombolt.

QEq
Wounds caused by Psychic Powers
Tzeentch's Firestorm: 3 hits, S5 on average (benefit of the doubt), 2.5 wounds, 1.666... dead. If 1 model dies average 2 S3 AP- hits on the unit, 1 wound, 0.666... dead for a total of 2.333... dead if the first hits caused a casualty. If 2 models died, average 4 S3 AP- hits, 2 wounds, 1.222... dead for a total of 3.888... if the first hits caused 2 wounds.


Doombolt: 3 hits, 2.5 dead if no cover, 1.666... if in 5+ cover and 1.25 dead if in 4+ cover.

Noise Marines
25 S4 shots, 16.666... hits, 11.111... dead. Blastmaster gets 3 hits, 2.5 wounds, 2.5 dead for a total of 13.6111... dead.

Thousand Sons
Out of cover:

Outside of Rapid Fire range:  9 S4 shots, 6 hits, 4 wounds. 5.666..., 6.333... or 7.888... dead with Tzeentch's Firestorm, 6.5 with Doombolt.

Inside Rapid-fire range: 18 S4 shots, 12 hits, 8 wounds. 9.666..., 10.333... or 11.888... dead with Tzeentch's Firestorm, 10.5 with Doombolt.


In 5+ cover:
Outside of Rapid Fire range: 9 S4 shots, 6 hits, 4 wounds, 2.666... unsaved wounds. 4.333..., 5 or 6.555... dead with Tzeentch's Firestorm, 4.333... dead with Doombolt.

Inside Rapid Fire range: 18 S4 shots, 12 hits, 8 wounds, 5.333... unsaved wounds. 7, 7.666... or 9.222... dead with Tzeentch's Firestorm, 7 dead with Doombolt.


In 4+ cover:
Outside of Rapid Fire range: 9 S4 shots, 6 hits, 4 wounds, 2 unsaved wounds. 3.666..., 4.333 or 5.888... dead with Tzeentch's Firestorm, 3.25 dead with Doombolt.


Inside Rapid Fire range: 18 S4 shots, 12 hits, 8 wounds, 4 unsaved wounds. 5.666..., 6.333... or 7.888... dead with Tzeentch's Firestorm, 5.25 dead with Doombolt.

There you have it. Noise Marines annihilate Thousand Sons when it comes to versing TEq and GEq. I didn't bother with T3/4+ saves because the results would be similar to MEq in that 1k Sons ignore armour while Noise Marines don't, whereas against TEq neither ignores armour and against GEq both do.

Also, there are a few notes that I'd like to make on their game-play that you cannot work out with math:
  • Noise Marines can do their maximum amount of damage at least a turn earlier than Thousand Sons because they can achieve this at 24" while Thousand Sons need to be within 12" to really be effective
  • As a result of this Noise Marines are far less likely to get assaulted earlier and can therefore shoot for longer, increasing the damage they'll do over the course of a game even further, making them even better
  • When being shot back at the Noise Marines are more survivable thanks to a combination of armour/cover save and Feel no Pain (which do a better job than a 4++ save if they're getting shot at by AP3 or better), so Noise Marines are more survivable in fire fights as well
  • In combat Noise Marines strike at Initiative 5 which allows them to kill more models before the enemy has a chance to strike, reducing the number of wounds actually caused on the Noise Marines, end then they have armour and FnP to get them throu

Monday 3 December 2012

Why 'Fluff' is Important in Warhammer 40k

There are a bunch of WAAC gamer douchebags that always winge about how Games Workshop restricted the allies of the armies and didn't just let everyone ally with everyone (yes, I'm looking at you YTTH fanbois). This kind of retarded, pompus "look at how hipst@ i am, i don't even care about the fluff" pisses me off to no end.


Why'd they even bother writing about this guy?

First I'd just like to say that I'm not completely against WAAC gamers nor do I think that everyone should make their lists fluffy and whatnot, just that anyone that completely disregards the lore is a complete and utter moron.

So why is it so important?

Well, it's pretty fucking interesting for starters. I will admit that there's some pretty boring lore here and there, but for the most part it's fantastic.

But the major point I think is that there would be no 40k without it and there wouldn't be a game for wankers like all the YTTH fanbois to play in the first place. If there was no fluff/lore, there would be no Space Marines or Tau, no Orks or Tyranids. Instead you would have Army 1, Army 2, Army 3 and so on, each with different point costs and stats. And while we're at it, why bother with different models or terrain? Instead the armies all have the same models, but Army 1 is blue and Army 2 is red! And instead of rules for buildings, it's rules for cardboard boxes and books. The game can be called "Sci-Fi Miniature Tabletop Game". Sounds fucking great!

Seriously though, who would buy something like that? No one, that's who. And that means that Games Workshop goes out of business and there's no 40k for YTTHFB to bitch about.

Aside from the fact that the lore is an integral part of the hobby, there are a few other benefits it has. First, it can help inspire one to make their army look cool based on stories, it gets people to buy other armies because they like their lore (thus making GW more money) and it makes your army far more interesting and adds a lot of character to it on the tabletop, which ultimately enhances the gaming experience.

But why should the fluff play a part in how the rules are written (e.g. limiting the armies an army can ally with)?

Because fuck you, that's why.

On a slightly more serious note, it's because it breaks the game. Every tournament would consist of the same two armies allied to each other because it's the most broken combo available, and anyone not playing these two armies gets destroyed in every game they have, don't enjoy it at all and never go to a tournament again. It takes all the fun out of the game and removes any serious thought that needs to be given to writing a list or who to ally with.

People who legitimately ask this question are the people that ruin this hobby for other people, the kind that take the fun out of everything and paint their armies to the standard three colour minimum so they can score some extra points in tournaments. If you're one of these people, go set your three-colour army on fire and choke on the ashes.

Thoughts? Comments?

Sunday 25 November 2012

Skaven Sabotaged at Local Tournament!

Someone loaded my dice, I swear!

...

Seriously though, I finally got to compete in my first tournament with my Skaven. It was a great day. Ten players went along, payed $10 each and got three games with first and second place splitting the money in Games Workshop vouchers.

It was played at 1500 points, and there was a few different armies around. There was, however, a good 3 or 4 Warriors of Chaos armies. One of them was played by a guy who had only just started Fantasy about a week earlier, but he still did surprisingly well considering his experience. He placed 4th overall with a completely unpainted army.

Anyway, from what I could gather, you could score a maximum of 30 points for painting, something like 15 points for sportsmanship and... Uh... Well I honestly don't know about the games. I know that winning is good though, and that's what counts, right?

Let's get down to it. Here's the army list I brought along:
Lords - 240pts.
Grey Seer - 240pts.

Heroes - 169pts.
Warlock Engineer - Doomrocket - 45pts.
Chieftain - BSB, Storm Banner, Great Weapon - 124pts.

Core - 384pts.
20 Clanrats - Shields, Full Command - 110pts.
40 Skavenslaves - Musician - 82pts.

Special - 407pts.
32 Plague Monks - Full Command, Plague Banner - 279pts.
8 Plague Censer Bearers - 128pts.

Rare - 300pts.
Doomwheel - 150pts.
Doomwheel - 150pts.

TOTAL - 1500pts.

So there were some issues with it that only really became apparent after playing in a tournament setting like this against a number of army lists that varied from what I'd previously faced, but we'll get into that more at the end. Unfortunately the army type didn't vary a whole bunch, as you might expect in a 3 game tournament, but I ended up facing Dwarfs, Warriors of Chaos and Warriors of Chaos again. Fortunately the WoC armies were pretty different from each other, so it's not such an issue.

Game 1: Skaven vs Dwarfs
Game one was a tough one for me honestly. I've only ever faced Dwarfs once with this specific army list and won that, although I've faced them plenty of other times at different points and whatnot and lost all of them. In short, I hate Dwarfs.

The game was Battleline. His army consisted of an Organ Gun, a Grudge Thrower, a Cannon, 40 Long Beards with Great Weapons joined by a Thane and another smaller unit of Warriors with Great Weapons joined by a Rune Priest.

Apologies in advance for my not-completely-painted army. I can't speak for everyone else, but as far as I can see they're trying!
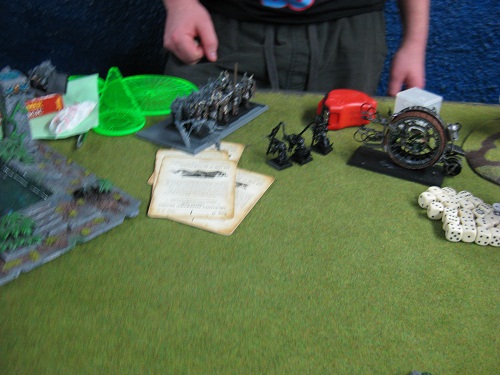
Dwarf deployment.

Skaven deployment.

Unfortunately my significantly larger amount of guys and the initial placement of some Slaves seriously screwed over my deployment. I couldn't react properly and it was really going to be a tremendous effort for me to make it to him. I think a better deployment would've helped me far more in this game, but I really don't think I could do too much considering the size and number of my units.

Dwarfs got first turn.

The first couple of turns went as pretty much anyone could predict: I moved forward and he sat back and shot me. His Cannon smashed my Doomwheel and his Grudge Thrower did a number on my units. The Storm Banner didn't stop anything and then ended on my first turn. My magic also did nothing at all ever all game, so I won't even bother mentioning it anymore.

By the end of turn two we had this:

Notice the zero Dwarf casulties...

From there it was pretty downhill. There's no breaking those Warrior units and with one unit of Slaves gone, the other way too far away to do anything and a Doomwheel that would die next turn, leaving me with no real hard-hitting units, there wasn't a whole lot I could do. The Plague Monks even failed a 10" charge on the War Machines by an inch.

The rest of my army was pretty much just shot to bits, my Grey Seer and his Clanrats fled and failed their leadership 7 rally test twice to run off the table and the BSB's unit was massacred by the Long Beards.

Luckily my opponent was a decent guy though, but apparently has some reputation, seeing as when I told one of the other players that I lost he was all like "What, how did... Oh, you were facing Peter B."

I still need to work out how to beat those damn Dwarfs...

Game 2: Skaven vs Warriors of Chaos
This was the game against the new guy, and arguably the most enjoyable game I had all day. Unfortunately it was Dawn Attack, so deployment ended up getting seriously spastic...

His army was a unit of Mark of Tzeentch Shield Warriors, Mark of Khorne Shield Warriors (might have been Chosen?) and a unit of the new Juggernought-riding-guys, an Exalted Champion on a Juggernought and Festus with the Tzeentch Warriors.

He ended up having to deploy the Juggers and Khorne Warriors in the middle and the Tzeentch Warriors on his right flank.
Warriors of Chaos deployment.
 As you can see, my deployment was just a little but more spastic with all my units. From left to right we've got a unit of Slaves on my left flank (the guy out the front is where they're actually meant to be, but they'd have fallen over if I placed them that far forward on the hill), both Doomwheels had to be deployed in the middle (they were also the last things placed, leaving them with very little room) with the Grey Seer and Clanrats just behind them, followed by the other Slaves, Plague Censer Bearers and then the Plague Monks, Clanrats and BSB on the right flank.

My apologies for the blurry picture, I had to hold the camera above my head to get the shot.


Skaven deployment
 We both just moved forward with my Doomwheels moving away from each other so I didn't lose them to their own Zzzap!'s and the Slaves moving to tarpit some Warriors. I Dreaded 13th'd the unit of Khorne Warriors and then finished them off with a Doomwheel.

I did have a few unfortunate accidents though. Mainly the Doomrocket. I threw four dice at it, and ended up with three 1's, followed by another 1 on the Misfire chart. The result was, well, lots of dead Slaves. Meanwhile the other Slave unit failed their leadership 10 test, were out of range of my BSB who was on the other side of the board and exploded. The Doomwheel involved in that fight also fled, but luckily it was towards my opponents own table edge. I also tried to charge the Juggers with both my Plague Monks and Plague Censer Bearers. It would've gone a lot better if my Monks had made it so that my Censer Bearers actually lived to cause some damage, but alas the Monks moved up 3" while the Censer Bearers charged headlong into the beasts of Khorne...

On my second attempt to cast the Dreaded 13th I had Vorrik eat all 3 of his Warpstone Tokens, and rolled two ones with them as well as failing my attempt to cast, so he was down to one wound :sadface:

His Juggers overran into and then thoroughly mutilated my Plague Monks.

By the end of turn 2 we had this:


The Warriors in the top left are dead.

After this he did some wheeling with the Juggers and Warriors, I tried to do some manoeuvring with my Clanrats to get out of the path of those Knights-on-steroids. I charged the Warriors with my remaining Slaves as well as both of my Doomwheels. Unfortunately this didn't go quite as I was expecting, but oh well...
I honestly thought I had this one...

After that horrid combat ended, the Juggers massacred my BSB and co. and then my Grey Seer miscast Death Frenzy on 4 dice, rolled a 4 on the miscast table and then died horribly, taking 11 Clanrats with him and causing them to lose their shit and bail.

That's pretty much that. Those Khornate Super Knights are pretty insane.

Game 3: Skaven vs Warriors of Chaos (again)
The last game was that diagonal deployment one (I honestly have no idea what it's called) where you have to roll a die for every unit to see if it goes into reserves or not. My opponent deployed first and didn't have any issues with the reserves. I also wasn't having any troubles. That is, until I rolled for my Grey Seer...

His army consisted of 2 units of Warhounds, 2-3 WoC units, a unit of Knights, 2 Sorcerers and a couple of Spawn.

Seriously, of all models, not having my Lord on the table was slightly annoying, but what can you do?
Deployment.

My opponent decided to give me first turn. The Doomwheels killed both the Spawn and I moved everything else up in a way that would hopefully prevent him from making any charges I didn't want, i.e. I placed my Slaves about an inch or two from his Knights and my Plague Monks about the same distance from the Warhounds who were shielding a small unit of Warriors. I also totally forgot to fire my Doomrocket, even though that was exactly why I left that unit of Slaves so far back.

He cast Treason of Tzeentch on my Censer Bearers, which hurt a bit, but it wasn't too bad. The Knights caused my Slaves to explode, but then my Doomwheel pwned the Knights.

My other Doomwheel took on some Warriors and another unit of Hounds by itself for a turn or two before the Censer Bearers could make it. They then quickly finished the Hounds and caused the Warriors to flee, who then rallied and then turned back around, only to get flattened again and chased off the table. My Grey Seer also entered the field turn two, but didn't do a whole lot.

Plague Censer Bearers to the rescue!

His Khorne Warriors then did a number on my Plague Monks, but were positioned right near everything else in my army. He conceded at that point, as my Doomwheels were poised to cause serious damage and my Grey Seer had a couple of Warpstone Tokens to use for a Dreaded 13th.

The Plague Monks honestly did nothing all tournament.

So the last game was a victory to Skaven! Huzzah!
8th place overall out of 10, although it would've been 4th if my army was painted...

I'm not complaining though, seeing as it was my first Fantasy tournament. I'm just disappointed in myself for not getting off my ass and painting my army completely.

Anyway, I've been thinking about what went wrong, and there are a few things. First of all, the dice didn't entirely go my way, and Skaven are a very random army that rely on that a bit more than other armies on luck, however I'm not going to blame my losses on luck alone. If I were good enough I should've been able to play my way out of it.

The other issue was my inability to deal with enemies from a distance or get to them fast enough, which meant that Dwarfs were always going to cave my head in and taking on those Juggers was going to be a very difficult feat.

Deployment wasn't exactly fantastic, although in the first two games I don't really know how I could've changed that a whole lot, especially in the second game. I'll just have to work on that I guess.

Last of all, the Plague Monks take a huge chunk of points out of my army and their efforts really were quite pathetic. They're good for pushing a Plague Furnace (which hit like nothing else), but unless I'm taking a Furnace I don't think I'm going to bother with the Monks anymore.

So what to do? Well, I'm going to be trying out taking 2 Warp Lightning Cannons instead of 2 Doomwheels (or maybe even just one Doomwheel and the 2 Cannons...? We'll see) and I'm going to try pretty hard to get myself some Gutter Runners just to deal with those Dwarfs.

Some other things I've been contemplating are taking another Engineer at Level 2 with a Dispel Scroll, dropping the Grey Seer and taking my Warlord on Rat Ogre Bonebreaker with a 2+ rerollable save that causes S4 hits on the unit that causes the wound for every save passed. I used to play with him before I had my Grey Seer, and he was tremendous fun. Whether I actually use him in my next tournament or not is to be seen, but I'm definitely going to start using him again in some friendly games and see how he works out!

Does anyone else have any ideas? I was even thinking about a unit of Rat Ogres, or even just breaking out the Plague Furnace...

Saturday 17 November 2012

Lightning Claw vs Power Sword

There's been endless debate since the release of the new Chaos Space Marines codex on whether one should take a Lightning Claw or Power Sword on their Aspiring Champions.

Algebraic!

Now, first of all, why not any of the other Power Weapons? Well, the Power Axe may be AP2, but it strikes at Initiative 1, and on a guy who must issue Challenges, that's a very, very bad idea because he'll often be dead before he gets to strike. A Power Lance is really not that great for Chaos Space Marines because it only works on the charge, and you won't always be getting the charge. Plus, if you don't win in the first round, its effectiveness drops by a load. The last one is the Power Maul. Honestly, the Power Maul isn't all that bad, but I personally don't think it's such a great option on your Aspiring Champions because you won't be ignoring armour most of the time, so you'll probably die and your opponent won't.

That all said, Axes and Mauls are both great choices on Terminators in my opinion, but for now we're just focusing on your basic squad leader, whether he's in a Raptor squad, Chaos Space Marine squad, Noise Marine squad or whatever.

So, let's get down to the math!

We're going to assume your basic champ, so Initiative 4, WS4, 2 attacks and weapon + Pistol against a standard Space Marine opponent (since, let's face it, these are the most common opponents). We're also assuming you got the charge.

Lightning Claw
3 attacks, 1.5 hits, 0.75 wounds before re-rolls, another 0.375 after the re-rolls, coming to a total of 1.125 wounds at AP3, so a dead enemy Sergeant.

Power Sword
4 attacks, 2 hits, 1 wound, so one dead Sergeant.

Now the difference may seem pretty miniscule, but when it comes down to it, the Lightning Claw is far more reliable and will fairly consistently net you at least one wound, while the Power Sword, which may give you more chances to cause wounds, doesn't give you those re-rolls, so if you fail you're pretty much screwed.

But, just to make sure, let's see what happens against Terminators, T3 and T5 opponents.

Terminators
Lightning Claw
3 attacks, 1.5 hits, 1.125 total wounds, coming to 0.1875 dead Terminators.

Power Sword
4 attacks, 2 hits, 1 wound, 0.1666... dead Terminators.

T3 Opponents (e.g. Eldar Exarch)
Lightning Claw
3 attacks, 1.5 hits, 1 wound before re-rolls, 0.333... with re-rolls, coming to 1.333... dead T3 unit champions.

Power Sword
4 attacks, 2 hits, 1.333... unsaved wounds.

T5 Opponents (e.g. Plague Champion)
Lightning Claw
3 attacks, 1.5 hits, 0.5 wounds before re-rolls, 0.333... with re-rolls, coming to 0.8333... dead T5 opponents.


Power Sword
4 attacks, 2 hits, 0.666... wounds caused.

Alright, so it's pretty clear the Lightning Claw is the superior offensive weapon, but since making this post it was brought to my attention by Zeruel13 over in this thread on MiniWarGaming that, as a defensive weapon, the Power Sword is actually better.

Here's a copy/paste of the math Zeruel provided:
Against MEQ (WS4/T4)Lightning Claw (with charge bonus) - 1.13 wounds caused (0.18 unsaved vs 2+ armour)
Lightning Claw (without charge bonus) - 0.75 wounds caused (0.12 unsaved vs 2+ armour)

Power Sword (with charge bonus) - 1 wound caused (.16 unsaved vs 2+ armour)
Power Sword (without charge bonus) - 0.75 wounds caused (0.12 unsaved vs 2+ armour)

Power Maul (with charge bonus) - 1.66 wounds caused (0.55 unsaved vs 3+ or 0.27 unsaved vs 2+ armour)
Power Maul (without charge bonus) - 1.25 wounds caused (0.41 unsaved vs 3+ or 0.2 unsaved vs 2+ armour)

Against GEQ (WS3/T3)Lightning Claw (with charge bonus) - 1.79 wounds caused
Lightning Claw (without charge bonus) - 1.19 wounds caused

Power Sword (with charge bonus) - 1.79 wounds caused
Power Sword (without charge bonus) - 1.34 wounds caused

Power Maul (with charge bonus) - 2.22 wounds caused
Power Maul (without charge bonus) - 1.67 wounds caused

Against EEQ (WS4/T3)Lightning Claw (with charge bonus) - 1.34 wounds caused
Lightning Claw (without charge bonus) - 0.89 wounds caused

Power Sword (with charge bonus) - 1.34 wounds caused
Power Sword (without charge bonus) - 1.05 wounds caused

Power Maul (with charge bonus) - 1.66 wounds caused
Power Maul (without charge bonus) - 1.25 wounds caused

Against Biker MEQ (WS4/T5)Lightning Claw (with charge bonus) - 0.83 wounds caused
Lightning Claw (without charge bonus) - 0.55 wounds caused

Power Sword (with charge bonus) - 0.66 wound caused
Power Sword (without charge bonus) - 0.5 wounds caused

Power Maul (with charge bonus) - 1.34 wounds caused (0.44 unsaved vs 3+)
Power Maul (without charge bonus) - 1 wound caused (0.33 unsaved vs 3+)

He's included the Power Maul as well, because Zeruel believes it's an equally viable option. Personally I disagree, but I guess that's a matter of opinion and what you face.

With Zeruel's information taken into account, I'll be taking Lightning Claws every time on units made for the charge (CCW Chaos Space Marines, Berzerkers, Raptors) while on units that are meant to be shooting a little more up close (anything with a Plasma Gun) then the Power Weapon is definitely going to be my weapon of choice. I still don't think I'll take either on my Noise Marines though, because I'd be taking the Doom Siren first and another 15 points on top of that is just too much for a shooty unit, especially one sitting back 24".
But, like, that's just my opinion man.

Which one are you going to take?

One More Week...

...until my 1500 Fantasy tournament with my Skaven. Unfortunately I've been getting a bit side-tracked with all my Chaos Space Marines and a little Wood Elves, and so have only really spent about an hour on my Plague Monks in the last week...

Photobucket
Seriously hoping for no Misfires!

Anyway, I think I'm going to be leaving my Plague Monks half done as they currently are and am going to get started on my Slaves. I know for sure that I'm definitely not going to get a very good score for my painting, but I'd at least like to get as much as I can!

So here's to hoping for the best, I guess!

Thursday 15 November 2012

Chaos Space Marines: Checking Out the Raptor Sprue

After a couple of weeks of waiting, my Raptor kits finally arrived. So, naturally, as one does when they've been waiting for three weeks for something they so desperately yearn for, I thought I'd go make a pie, maybe browse MiniWarGaming, do some work on my vocals and do some study. With that all out of the way, it was finally time to sit down and see what's in the box...

So. Many. Bits.

So this is what we got in just one of the boxes. Only two sprues, but they were absolutely packed with bits. Let's have a closer look, shall we?

Legs, Jump Packs, bodies and mostly Warp Talon stuff.

More legs and Jump Packs, as well as all the bits you'll want for Raptors!

Both sprues are about as full as they could possibly be with stuff. The number of Lightning Claws that come in this box is brilliant! I think I have a good 18 of them to use after using one for my Raptor Champ and keeping one for my Lord out of two boxes of Raptors.

The other thing I was actually really impressed with was that while you still only get one of each special weapon (as with every GW kit ever), they actually give you two sets of arms to wield the special weapons with per kit, so that even if you only buy 5 you can still take a Meltagun and a Flamer without searching around for any spare bits or buying anything else. Not that taking 5 Raptors is a good idea though...

So what does that mean for me? It means I'm about half way in terms of Plasma + arms to a Plasma Chosen squad. Definitely stoked.

As for the bits themselves, everything looks fantastic. The detail and number of spiky bits are very chaotic. There's even teeth on the top of all the Jump Packs. There's so much customisation available in the Raptor box. It has to be the most enjoyable kit I've ever got my hands on.

Anyway, after a good 2-3 hours of work, I've got them this far:

Who needs Jump Packs when you've got skillz?

Or heads, for that matter...

I'm leaving the heads, Jump Packs and shoulder pads off them all until they've been painted, as well as the Meltaguns. I realised it'd be too hard to paint after making the mistake of sticking some on without thinking, but oh well, what can you do? And the armless guy is going to be the icon bearer. I'll be using the standard from the Slaanesh Helstriders (or whatever they're called... I think that's it?) which I'll mostly be buying so I can mount my Lord on a Steed of Slaanesh.

So that's it from me for now. If you have any excuse to run some Raptors, I'd definitely suggest it. They seem like they'll be a very good option on the tabletop too. Time will tell...

Friday 9 November 2012

Noise Marine Parts All In

My Sonic Weapons and 25mm Ruins scenic bases from Back 2 Base-ix have finally arrived! Now I'm just waiting on 2 boxes of Raptors and everything I had ordered will be in and we can hopefully start getting a few 750-1000 point games in fairly soon.

Bases make (ノ^∇^)ノ "ALL OF THE DIFFERENCE...!"


The bases look very nice and have a good amount of detail on them, but they definitely weren't flawless. Either way, I'm not really complaining because the end result should be great - definitely much better than just basing my guys with sand/grass or whatever. I intend on using these scenic bases for most of my army, except maybe the Cultists and Raptors.

GW's really getting their shit together with Finecast


The other arms are still on the sprues. Despite being Finecast, the Sonic weapons really have very few issues. It just takes a little to clean them up with a hobby knife, but otherwise they were almost perfect. In the set I've opened so far, I've only found a couple of bubbles on the bottom of the wires on two of them, which is hardly much of an issue. The detail is fantastic and I really have no issues about ordering more for my second unit.

I've also changed my list up a reasonable amount since the first draft I posted, so here's what I'm aiming for now:
HQ - 165pts.
Chaos Lord - Mark of Slaanesh, Steed of Slaanesh, Lightning Claw, Power Fist, Sigil of Corruption - 165pts.

Troops - 749pts.
10 Noise Marines - 8 Sonic Blasters, Blastmaster, Icon of Excess - 264pts.
20 Cultists - 18 Autoguns, Flamer - 113pts.
20 Cultists - 18 Autoguns - 108pts.

Fast Attack - 506pts.
Heldrake - Baleflamer - 170pts.
3 Chaos Bikers - 2 Meltaguns - 90pts.
9 Raptors - 2 Meltaguns, Lightning Claw, Mark of Slaanesh, Icon of Excess - 246pts.

Heavy Support - 230pts.
5 Havocs - 4 Autocannons - 115pts.

Fortifications - 100pts.
Aegis Defence Line - Quad-gun - 100pts.

TOTAL - 1750pts.

C&C more than welcome!

Wednesday 7 November 2012

Wood Elves Finally Begun!

Photobucket
Too pretty not to start, right?

After months of wanting to get a Wood Elf army started, I decided I'd cement the decision and buy myself a box of Glade Guard, just so there's no backing out anymore. I've also got an entire 2400 MSU winter-themed list made up, so tell me what you think!

Photobucket
Capes will be painted and added separately.

And the list, just so you know what I'm building to:
Lords - 570pts.
Highborn - Wardancer Kindred, Blades of Loec, Stone of the Crystal Mere - 260pts.
Spellweaver - Level 4 Wizard, Lore of Beasts, Moonstone of the Hidden Ways, the Deepwood Sphere - 310pts.

Heroes - 287pts.
Noble - Battle Standard Bearer, Light Armour, Asyendi's Bane, Hail of Doom Arrow, Ironcurse Icon - 137pts.
Spellsinger - Level 2 Wizard, Calaingor's Stave - 150pts.

Core - 1069pts.
12 Glade Guard - Musician, Standard Bearer, Banner of Eternal Flame - 172pts.
10 Glade Guard - Musician, Standard Bearer - 138pts.
19 Eternal Guard - Musician, Standard Bearer, Razor Standard - 291pts.
8 Dryads - 96pts.
8 Dryads - 96pts.

Special - 133pts.
7 Wardancers - Musician - 133pts.

Rare - 340pts.
5 Waywatchers - 120pts.
Great Eagle - 50pts.

TOTAL - 2399pts.

So there we have it. The list is meant to be fairly competitive whilst sticking to the winter theme, hence the Eternal Guard and minimal Forest Spirits. It should be quite interesting to play once it's finally complete, especially being the complete opposite of everything I know about Fantasy with my Skaven.

All comments and criticism welcome!

Wednesday 31 October 2012

Necron Painting Tutorial - Lychguard

I worked on this for so long... I will guard it with my life.

Hey guys! So, as promised I've made my first tutorial. I decided to paint up a Necron Lychguard as I personally believe that it's an awesome model, but also because it has some fine detail that needs attending to. Just a side note, the pictures included in the tutorial aren't the best of quality, but hopefully they will be good enough to give an idea of what I'm actually doing. Also, all the paints used are from the Citadel range. With that being said, lets begin!

NOTE: Where it says "watered down", I really only put a small drop of water in. Don't water it down too much.


First up, I decided which position I would like my Lychguard to be in, so I played around with it for a little while until I found a position that appealed to me. I also added a brass grate from the 40k basing set, just for good measure.

Next I under coated my model with Chaos Black Spray.


Then, using Leadbelcher I applied a heavy dry brush to all areas I wanted to be metallic metal, this was then followed up with a lighter dry brush of Ironbreaker. To create an underlying tone of rust, I  applied a wash of watered down Null Oil about a 1:1 ratio. Once dry, I applied a watered down wash of Agrax Earthshade, again about a 1:1 ratio. 


Now, with the initial base coating out of the way, it's time to move onto the highlighting! I then reached for Ironbreaker again and applied a light dry brush over the metallic areas. (Be cautious not to apply too much Ironbreaker, as you may spoil the 'rusty' effect. Start slowly and lightly to avoid any mishaps.)


Next, I went for Runefang Steel and with a finer brush applied generous highlights to areas where the light would hit the most. Mainly being the corners and edges.


With the main part of the body all done, it was time to move onto painting the gold. I started with a base coat of slightly watered down Hashut Copper. This was followed by a layer of Gehenna's Gold.


I then applied a wash of Agrax Earthshade over the whole gold area. Once dry, I applied another coat of Gehenna's Gold, but made sure to leave the wash in the recesses. To finish it off, I sparingly highlighted the edges with a 1:1 mix of Gehenna's Gold and Runefang Steel.


With the gold also out of the way, I decided to start work on the Dispersion Shield. The metal and gold were painted in the same way as mentioned above. Because the undercoat of Chaos Black was a reasonably smooth coat, I decided to leave it and not bother painting a layer of black over it. I then moved on to painting the green lighting effects on the edges of the shield. 

This was done using a watered down layer of Warpstone Glow nearly all the way around the edges. To make it look a little more effective, I applied a watered down layer of Moot Green on some of the edges. The ovals between the metal were painted again using Warpstone Glow and Moot Green and were also applied in the same order. I even added a touch of White Scar to the Moot Green, just to make it stand out a little more.


Now, moving onto the sword: this was a little bit tricky. The gold was painted in the same manner as mentioned before. Again, leaving the black from the undercoat I went straight to painting the green power effects on the blade. Using a watered down Moot Green, apply irregular shapes onto the blade focusing more towards the edges. Then, using Warpstone Glow, apply a layer on the outskirts of the irregular shapes. This will be your base coat to work with when you start to blend the paint together. 

To achieve this blending effect, I used a very watered down Moot Green and applied numerous layers, each time trying to create a smooth transition between the two colours. (It is important to note, not to rush this process or else you risk ruining the effect. Wait for each layer to dry until applying the next. It may take a while, but the overall effect will be well worth it!) For extreme highlights, I used a 1:2 mix of Moot Green and White Scar which was applied on the very edges of the blade to finish it off nicely. 

The green light effects on the rod and in the grooves of the blade were painted using Warpstone Glow followed by Moot Green, both of which were watered down.  


Last but not least, the Lychguard's head! Unfortunately I could not get any close up shots of the head as they always came up blurry! But it is still visible in the full body shots I took. So I decided to paint the main part of the head first and leave the gold decoration until last. The white was first painted using a base coat of Ceramite White, I then used White Scar with a tiny drop of Fenrisian Grey and watered it down. I did two layers of this mixture to make it nice and smooth. I then highlighted the edges of the face with pure White Scar. The gold was again painted in the same manner as mentioned above. 

The eyes were painted starting with a layer of Warpstone Green. This was followed by Moot Green, and then mix of Moot Green and White Scar that was applied directly onto the centre of the eye. To create a glowing effect, a very watered down Moot Green was used as a glaze just under the eye.

Final Product


Ready to stomp Zero.

To finalise the Lychguard I picked out his chest glyph and orb using Moot Green. I then based the model to give it some extra detail. So there you have it! One Lychguard armed and ready for battle. I hope this tutorial was of some use to you and please, if you have any comments or questions do not hesitate! Thanks.